PRO PlusUpdated 6 months ago
Shop Theragun PRO Plus
The ultimate muli-therapy device for athletic performance.
Key Product Features
- Powerful 16mm percussive massage therapy
- Vibration therapy with 3 vibration speeds: 47, 50, 53 Hz
- Heat therapy with 3 temperature levels (45°C/113°F, 50°C/122°F, 55°C/131°F)
- Built-in near infrared LED light therapy
- Built-in biometric sensor for on-device heart rate readings
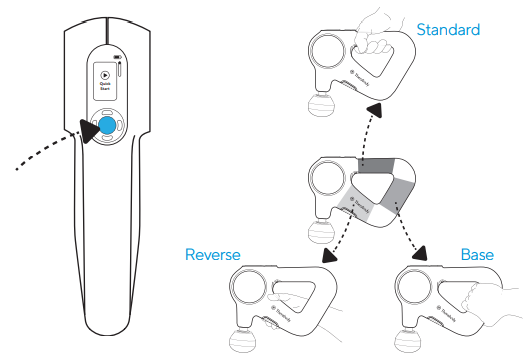
- 5 attachments: Dampener, Standard Ball, Thumb, Micro-point + Wedge
- Patented triangle grip to reach more of your body than other devices
- 5 speeds + LCD screen to manage massage speed and force
- Bluetooth connection to the Therabody app
What's included in box?
- Theragun PRO Plus Device
- Built-in LED light therapy
- Built-in Biometric sensor
- 5 attachments: Standard Ball, Dampener, Thumb, Wedge, Micro-point
- Heat therapy attachment
- Vibration therapy attachment
- QuietForce solution
- USB-C charging cable
What attachments are included?
The Theragun PRO Plus is engineered to relieve pain, improve mobility, and optimize recovery. It includes the following:
- Vibration Therapy - Relieve joint pain and treat sensitive areas.
- Heat Therapy - Loosen up stiff muscles and accelerate recovery.
- Dampener - Reduce aches and pains in tender or sensitive areas.
- Wedge - For shoulder blades, IT bands, scraping and flushing.
- Micro-point - Increase circulation and stimulate recover.
- Standard Ball - Reduce tension with an all-over body massage.
- Thumb - Ease your lower back, trigger points and painful knots.
Cold Therapy is also available to help reduce inflammation, pain and swelling. Sold separately here.
Turning on Your Device
Firmly press the center button to turn on the device. The device’s TFT LCD screen will light up when the device is on. You can select Quick Start or toggle through a variety of treatment routines using the up and down buttons. Press the center button to select your treatment. Move the Theragun PRO Plus device back and forth over the area you’re treating and experiment with different amounts of light-to-moderate pressure on your body. Do not start by putting pressure directly on an area of discomfort. Instead, work slowly around the area to reduce tension.
Adding Attachments
Ensure that the device is powered off before connecting or removing any attachments. Line up the white dot on the device with the white dot on the attachment. Insert the attachment into the device arm, twist and lock into place. To unlock and remove the attachment, twist in the reverse direction and pull it off.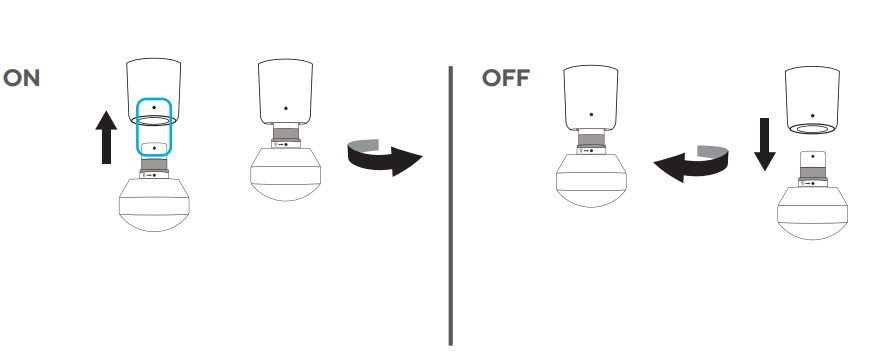
Infrared LED Light Therapy
To add infrared LED light therapy to your routine, toggle to the infared LED light indicator. Short press to turn the infrared LED light therapy on and short press to turn it off. Infared LED light therapy is most effective when applied directly to the skin. Infrared LED light therapy can be applied to the treatment area simultaneously with percussive, vibration, and heat therapy. To maximize your treatment benefits, use for approximately 90 seconds on each treatment area. Infrared LED light therapy will not turn on during cold treatments.
Vibration Therapy
To add vibration therapy to your routine, connect the vibration attachment to your device.
Heat Therapy
To add Heat Therapy to your routine, connect the Heat Therapy attachment to your device. Short press the right button to toggle to the heat indicator. Short process the up button to increase the heat temperature and short process the down button to decrease the heat temperature. There are three hot temperature settings.
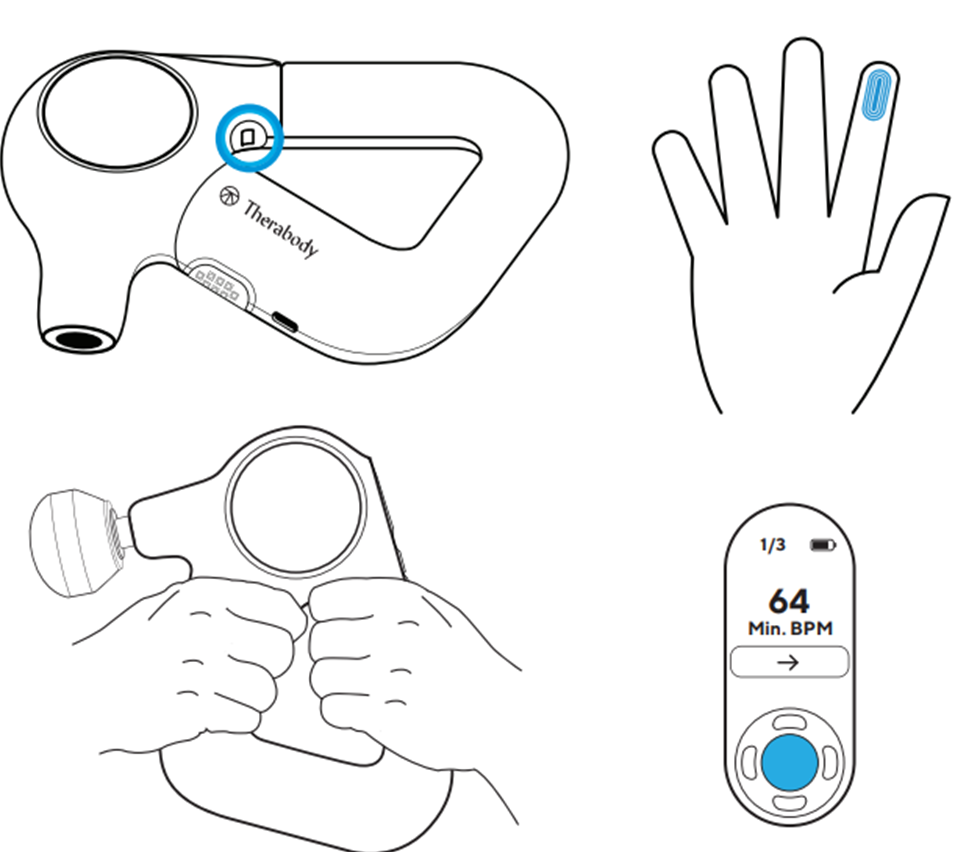
Biometric Sensor
To use the device's biometric sensor, hold the device in the "double-grip" position while keeping the tip of your pointer (index) finger placed on the biometric sensor. Cover the entire sensor with the tip of your finger. Do not squeeze or firmly press the biometric sensor, as this may lead to inaccurate readings.
Charging and LED Indicator Guide
Ensure that the device is powered off before charging, the device will not power on while charging.
- The device's battery level is continuously displayed on the TFT LCD screen in the top right corner when the device is powered on.
- When the device is powered off and charging, the device's battery percentage level will be displayed on the TFT LCD screen.
- Once fully charged, the battery icon will turn solid green and display a charge level of 100%.
- When charging is complete unplug USB-C cable from the device.
Care and Cleaning
- The Theragun PRO Plus is NOT waterproof or machine washable. Do not allow any liquid or water to enter the device or charging port.
- Ensure that the device is powered off before cleaning.
- To clean, wipe the device surface with a disinfectant wipe to remove any residue. Ensure that the biometric sensor is clean for optimal scanning precision.
- Once the device is residue-free, use a clean disinfectant wipe to thoroughly clean the device surface and attachments, wiping in a circular motion.
Specifications
Battery Life |
|
| Weight |
|
Dimensions |
|
| Material |
|
User Manuals
Theragun PRO Plus Unit Warnings